Signal validation utilities
This section describes a way to validate audio signal used for speaker enrollment in a speaker verification task. However, since IDVoice SDK 3.12 there is a simpler way to achieve this described in the IDVoice quick start guide (see CheckQuality method of the QualityCheckEngine class).
Synopsis
A positive user experience with voice biometrics depends on the user providing audio input that is of sufficient quality to work with the IDVoice biometric algorithms. ID R&D therefore enables preprocessing analysis of the audio input to assist the application developer to evaluate the quality of the input. Depending on the user task, you may assess the Signal-to-Noise Ratio (SNR), length of human speech in the audio, and so on. If the input audio fails to meet a reasonable criteria for quality, then the application may re-prompt the user to try again. For example, if an audio signal doesn't contain enough human speech to create a precise enrollment “voiceprint,” the application should ask the user to repeat the attempt. These helpful preprocessing features exist in the IDVoice CC SDK Media component. The package includes the following classes, which will be described in the next sections:
- SpeechSummary
- SNRComputer
- SpeechEndpointDetector
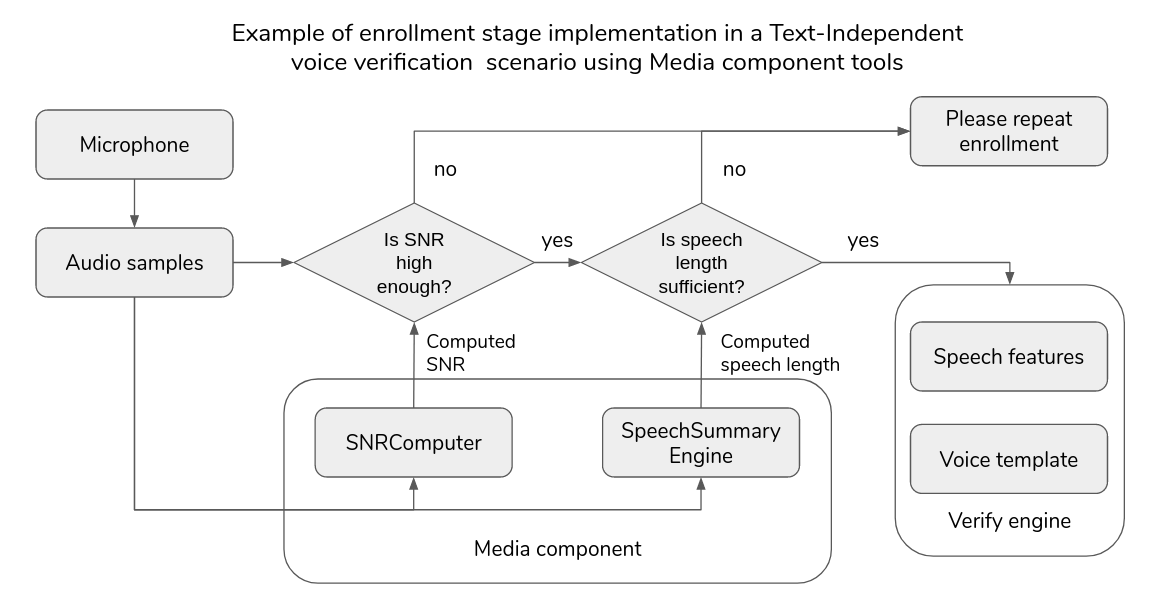
The flow diagram below gives an overview of how you may use the tools from the Media component during the enrollment stage in a Text-Independent voice verification scenario. In this example the SNRComputer and the SpeechSummaryEngine calculate statistics over the recorded audio samples, and based on these values, we can condition the system to repeat enrollment if the stats show that current signal properties are unacceptable. For more real-life examples please refer to the example use cases chapter.
Most of the provided examples are implemented in Python only since their main purpose is to give a description of the logic without complex technical details.
SpeechSummary
The SpeechSummary component provides calculated statistics regarding the length of human speech in the provided audio input. Statistics include:
- Human speech signal length
- Background noise length
- Voice Activity Detection (VAD) mask
VAD is a speech processing technique indicating the presence of a human voice in an audio signal. There are multiple positive impacts of VAD usage. First, this is an essential technique in cellular radio (GSM, CDMA) systems and VoIP (Voice over Internet Protocol): VAD helps to avoid the transmission of irrelevant silence packets and decreases power consumption in portable digital devices. Secondly, it reduces the amount of computations by discarding the audio segments where no human voice was identified. From the point of view of a signal quality, the advantages discussed above lead to more accurate voice footprints by skipping non-human voice audio segments containing noise and silence.
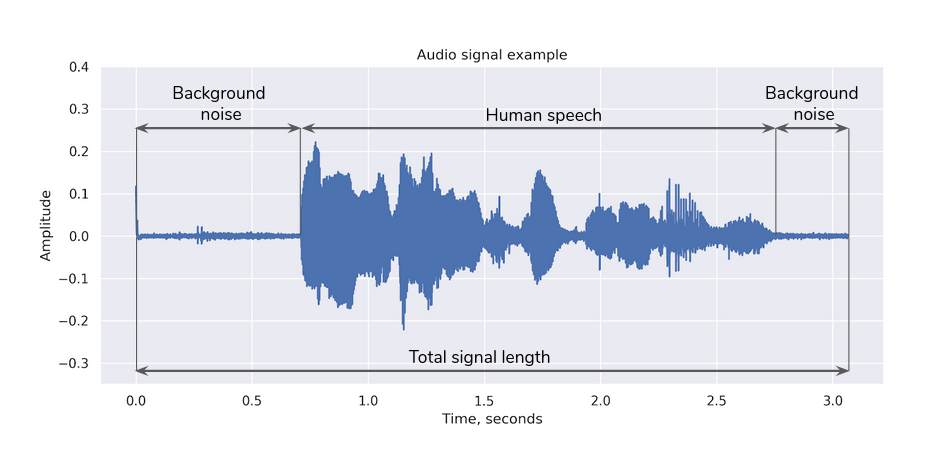
In general, the whole audio is a sequence of human speech intervals and background noise intervals as shown in the figure below. To compute VAD decisions, the VAD software splits the signal into short time frames and processes each frame. The resulting VAD mask contains the appropriate labels (1 or 0) for each such short time frame of audio depending on the decision if the frame contains human speech (1) or not (0).
One of the examples where VAD is useful is a speaker verification task. To make proper voice templates it is reasonable to use audio frames containing only human speech with background noise and silence removed. This leads to more accurate biometric templates and as a result higher verification system accuracy. So before creating the template, VAD is applied to the audio input. VAD is pre-built in the VoiceTemplateFactory by default. The SpeechSummary component is intended to be used before the template extraction and creation in a verification pipeline. By integrating it before VoiceTemplateFactory, you estimate the speech length in a signal and throw a corresponding error if that amount is not sufficient to obtain an accurate voiceprint. SpeechSummary component computes statistics given any of the following input options:
- from streams, where audio samples arrive in real-time
- from a file
- from samples of a waveform passed as a buffer
The input type of SpeechSummary component mainly depends on the application. Mobile applications will use length of speech on a wake-up word or a passphrase. Typical call center scenarios often use file / samples input to process call center recordings. Call centers also use streaming audio for real-time analysis to verify the identity of a caller while speaking with an agent.
Below code samples illustrate basic usage of the SpeechSummaryEngine class:
#include <voicesdk/media/speech_summary.h>

// ...

// 0. Initialize SpeechSummaryEngine
auto engine = SpeechSummaryEngine::create("/path/to/init_data/media/speech_summary");

// 1. Get SpeechSummary
std::cout << "Speech summary:" << std::endl;
auto summary = engine->getSpeechSummary("/path/to/wav/file.wav");
std::cout << summary << std::endl;
import net.idrnd.voicesdk.media.SpeechSummaryEngine;

// ...

// 0. Initialize SpeechSummaryEngine
SpeechSummaryEngine engine = new SpeechSummaryEngine("/path/to/init_data/media/speech_summary");

// 1. Get SpeechSummary
SpeechSummary result = engine.getSpeechSummary("/path/to/wav/file.wav");
System.out.println(result);
from voicesdk_cc.media import SpeechSummaryEngine

# ...

# 0. Initialize SpeechSummaryEngine
speech_summary_engine = SpeechSummaryEngine("/path/to/init_data/media/speech_summary")

# 1. Get SpeechSummary
print(speech_summary_engine.get_speech_summary_from_file("/path/to/wav/file.wav"))
Estimating speech summary is also possible using the streaming data coming directly from a real-time audio source using SpeechSummaryStream class:
import pyaudio
import numpy as np
import math
import sys
from builtins import input

from voicesdk_cc.media import SpeechSummaryEngine

# 0. Init engine
speech_summary_engine = SpeechSummaryEngine("/path/to/init_data/media/speech_summary")

# 1. Set recording params
sample_rate = 16000
buffer_length_samples = 4096

# 2. Create speech summary stream
speech_summary_stream = speech_summary_engine.create_stream(sample_rate)

# 3. Create recording stream
p = pyaudio.PyAudio()

input("Press enter key to start recording")

# 4. Open stream and start recording from microphone
stream = p.open(format=pyaudio.paInt16, channels=1, rate=sample_rate, input=True, frames_per_buffer=buffer_length_samples)

print("Press Ctrl-C to exit")
print("Recording...")

while True:
    # 5. Read chunk of data of size `buffer_length_samples` from recording stream
    audio_samples = np.frombuffer(stream.read(buffer_length_samples), dtype=np.int16)

    # 6. Add read samples to speech_summary_stream
    speech_summary_stream.add_samples(audio_samples)

    # 7. Print current stats of a speech_summary_stream
    if speech_summary_stream.has_speech_events():
        current_speech_summary = speech_summary_stream.get_total_speech_summary()
        print("Speech length: %.2f, User is speaking: %r " % (current_speech_summary.speech_info.speech_length_ms, \
                                                              current_speech_summary.speech_events[-1].is_voice), end="\r")
                                                          current_speech_summary.vad_result.frames[-1]), end="\r")
    sys.stdout.flush()

print("Done!")
stream.close()
SNRComputer
Signal-to-Noise Ratio (SNR) indicates the level of a desired signal to the level of background noise. It is defined as the ratio of signal power to the noise power in decibels, dB. A 0 db SNR means that the power of a signal is equal to the power of noise. Higher values of SNR indicates more signal than noise, e.g. 10 dB SNR shows that the ratio between the power of signal and the power of noise is 10, and 20 dB SNR shows the ratio of 100.
SNRComputer is a class that calculates speech SNR for a given audio signal or samples. Here we imply that speech SNR indicates the level of human speech (desired signal) to the level of non-speech signal segments (noise). The values of speech SNR for recordings made in the most common environments, assuming that the distance between speaker and the microphone is 0.3m, are as follows:
- “noisy street” - 5-10 dB
- “bathroom hall” - 10-20 dB
- “quiet room” - 15-30 dB
Below code samples illustrate basic usage of the SNRComputer class:
#include <voicesdk/media/signal.h>

// ...

// 0. Initialize SNRComputer
auto engine = SNRComputer::create("/path/to/init_data/media/snr_computer");

// 1. Get SNR
std::cout << "SNR, dB:" << std::endl;
float snr = engine->compute("/path/to/wav/file.wav");
std::cout << snr << std::endl;
import net.idrnd.voicesdk.media.SNRComputer;

// ...

// 0. Initialize SNRComputer
SNRComputer engine = new SNRComputer("/path/to/init_data/media/snr_computer");

// 1. Get SNR
float result = engine.compute("/path/to/wav/file.wav");
System.out.println(result);
from voicesdk_cc.media import SNRComputer

# ...

# 0. Initialize SNRComputer
snr_computer = SNRComputer("/path/to/init_data/media/snr_computer")

# 1. Get SNR
print(snr_computer.compute("/path/to/wav/file.wav"))
SpeechEndpointDetector
Speech Endpoint Detection is a procedure of detecting a timestamp when the speaking of a phrase is complete. Endpoint detection is used widely in speech processing, including speech recognition and speaker recognition. The Speech Endpoint Detection capability implemented in IDVoice supports frame-by-frame signal processing. It returns the current state of the Detector which indicates whether the speech endpoint has been detected or not. The logic behind this technology is to run an energy-based signal analysis and identify if the length of consecutive non-speech segments has reached the minimum required threshold, indicating speech has ended.
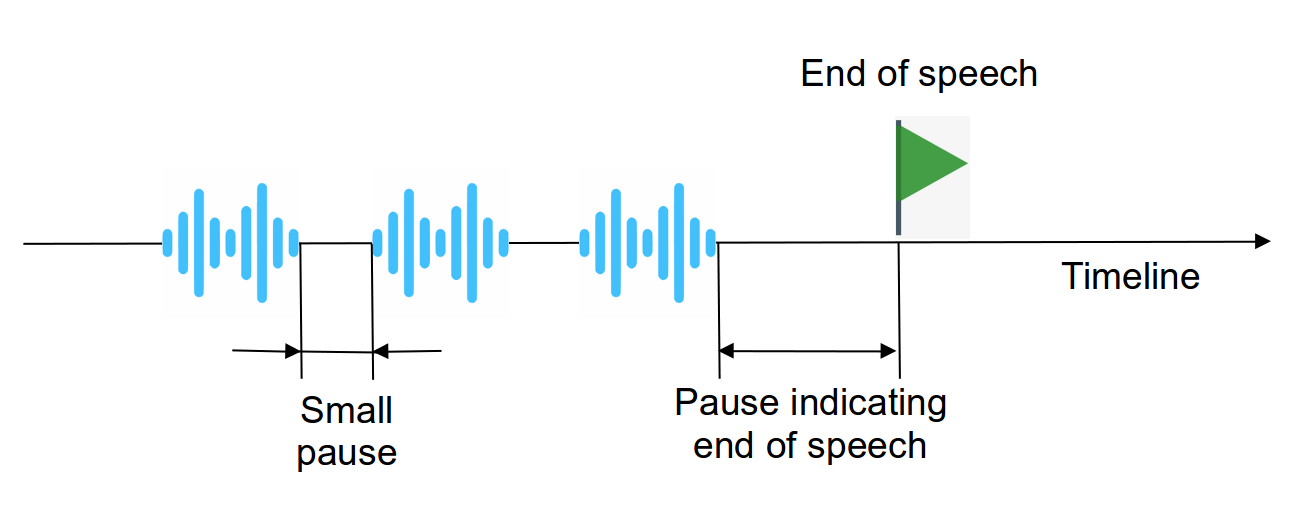
Speech endpoint detection is a feature that can be used to implement automatic audio recording stop. For example, it can be useful in a streaming verification scenario. The SpeechEndpointDetector class has a method providing the current state of speech endpoint detection (True if speech end was detected, and False otherwise). There are three parameters required for SpeechEndpointDetector initialization: a minimum speech length in milliseconds, maximum consecutive silence length, and an audio sample rate. The principle of work is as follows: after a “speech” buffer is filled up with the minimum required amount of speech frames, only then does SpeechEndpointDetector start to fill in the “silence” buffer. The “silence” buffer resets its state if human speech was detected, making sure that the complete stop is done when there was no human speech for at least “max_silence_length” consecutive milliseconds.
The same goal can be achieved using the getCurrentBackgroundLength() method of SpeechSummaryStream class.
Below code samples illustrate basic usage of the SpeechEndpointDetector class:
import pyaudio
import numpy as np
import math
from builtins import input

from voicesdk_cc.media import SpeechEndpointDetector

# 0. Set recording params
sample_rate = 16000
buffer_length_samples = 4096

# 1. Init SpeechEndpointDetector
min_speech_length_ms = 1000
max_silence_length_ms = 500
speech_endpoint_detector = SpeechEndpointDetector(min_speech_length_ms, max_silence_length_ms, sample_rate)

# 2. Create recording stream
p = pyaudio.PyAudio()
input("Press enter key to start recording")
stream = p.open(format=pyaudio.paInt16, channels=1, rate=sample_rate, input=True, frames_per_buffer=buffer_length_samples)
print("Press Ctrl-C to exit")
print("Recording...")

while True:
     # 3. Add a chunk of size ‘buffer_length_samples’ of a captured signal to speech_endpoint_detector
     audio_samples = np.frombuffer(stream.read(buffer_length_samples), dtype=np.int16)
     speech_endpoint_detector.add_samples(audio_samples)

     # 4. Check the current state of endpoint detector
     if speech_endpoint_detector.is_speech_ended():
         break
print("Done!")
stream.close()
Examples use-cases of Media components
In this chapter we provide the most frequent use-cases of Media components together with the main IDVoice functionality.
Enrollment Using SNRComputer
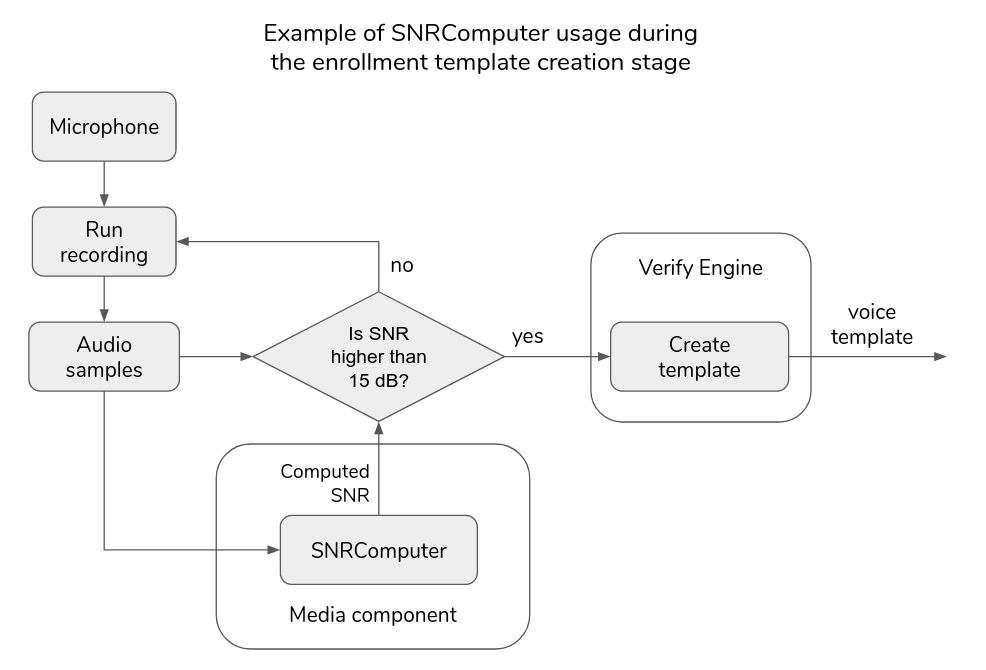
Since verification requires an accurate enrollment template, let's implement the SNR checking before creating an enrollment template. The proposed system is shown in the diagram below. In this example we assume that the minimum SNR required for a precise voice template is 15 dB. We’ll ask a user to repeat enrollment recording until the condition of minimum SNR is satisfied. The voice template will be created using the VoiceTemplateFactory and dumped on a disk.
Enrollment with SNR check example:
import math
import pyaudio
import numpy as np

from voicesdk_cc.verify import VoiceTemplateFactory
from voicesdk_cc.media import SNRComputer

# 0. Initialize minimal SNR in dB required for enrollment
min_snr = 15

# 1. Set recording params
sample_rate = 16000
record_length_ms = 5000
record_length_samples = int(record_length_ms * sample_rate / 1000)
buffer_length_samples = 4000

# 2. Initialize VoiceTemplateFactory and SNRComputer
factory = VoiceTemplateFactory("/path/to/init_data/verify/tel-3")
snr_computer = SNRComputer("/path/to/init_data/media/snr_computer")

# 3. Define a function capturing the sound
def record(record_length_samples, buffer_length_samples):
    p = pyaudio.PyAudio()
    recording_data = b""

    stream = p.open(format=pyaudio.paInt16, channels=1, rate=sample_rate, input=True, frames_per_buffer=buffer_length_samples)

    print("Recording...")

    for i in range(0, int(math.ceil(record_length_samples / buffer_length_samples))):
        recording_data += stream.read(buffer_length_samples)

    stream.close()
    print("Recording is done!")
    return np.frombuffer(recording_data, dtype=np.int16)

# 4. Repeat recordings until min_snr is satisfied
while True:

    input("Press enter key to start recording")
    audio_samples = record(record_length_samples, buffer_length_samples)

    # 4.1. Get current recording's SNR
    snr = snr_computer.compute_with_samples(audio_samples, sample_rate)
    print(f"SNR: {snr}")

    if snr > min_snr:
        # 4.2. Make template from recording and dump it on disk
        enrollment_template = factory.create_voice_template_from_samples(audio_samples, sample_rate)
        enrollment_template.save_to_file("recording.template")
        print("Enrollment is successful!")
        exit(0)
    else:
        print("SNR is too low, please repeat enrollment")
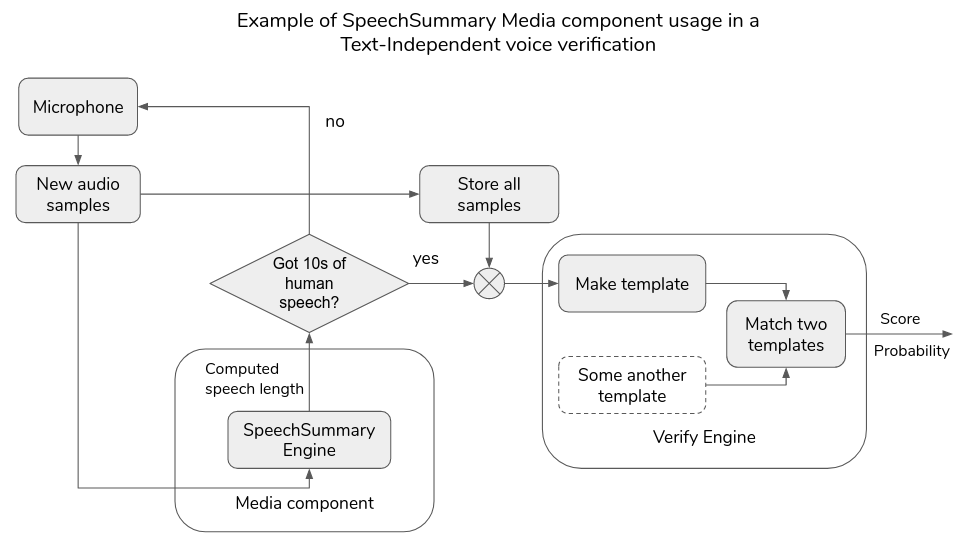
Speaker Verification and SpeechSummary
Let's consider implementation of a Verification system that collects two consecutive microphone recordings (implies streaming scenario) with at least 10 seconds of human speech and runs matching over the voice templates from these recordings. Voice templates from both sessions will be compared with each other using the VoiceTemplateFactory. The flow diagram of the system is shown below.
Verification with speech length check example:
import sys
import pyaudio
import numpy as np
from builtins import input

from voicesdk_cc.verify import VoiceTemplateFactory, VoiceTemplateMatcher
from voicesdk_cc.media import SpeechSummaryEngine
from voicesdk_cc.media import SNRComputer

# 0. Init engines
speech_summary_engine = SpeechSummaryEngine("/path/to/init_data/media/speech_summary")
voice_template_factory = VoiceTemplateFactory("/path/to/init_data/verify/tel-3")
voice_template_matcher = VoiceTemplateMatcher("/path/to/init_data/verify/tel-3")
snr_computer = SNRComputer("/path/to/init_data/media/snr_computer")

# 1. Set recording params
sample_rate = 16000
buffer_length_samples = 4000
min_speech_length_ms = 10000

p = pyaudio.PyAudio()

templates = []

for idx in range(2):
    # 2. Create speech summary stream
    speech_summary_stream = speech_summary_engine.create_stream(sample_rate)

    # 3. Open recording stream
    input(f'Press enter key to start recording {idx}')
    stream = p.open(format=pyaudio.paInt16, channels=1, rate=sample_rate, input=True, frames_per_buffer=buffer_length_samples)
    recording_data = b""  # this variable will store all recorded audio samples in bytes
    print('Recording...')

    # 4. Continue recording until required amount of speech length is reached
    while speech_summary_stream.get_total_speech_info().speech_length_ms < min_speech_length_ms:
        # 4.1. Read new chunk of data of size buffer_length_samples from recording stream
        current_chunk = stream.read(buffer_length_samples)
        recording_data += current_chunk
        audio_samples = np.frombuffer(current_chunk, dtype=np.int16)

        # 4.2. Add this chunk to speech_summary_stream
        speech_summary_stream.add_samples(audio_samples)
        print('Speech length: %.2f' % (speech_summary_stream.speech_summary_stream.get_total_speech_info().speech_length_ms), end='\r')
        sys.stdout.flush()

    print(f'\nRecording {idx + 1} is done!\n')
    stream.close() # stop recording

    # 4.2. Create template from all recorded samples in session (note, that VAD is applied under the hood)
    template = voice_template_factory.create_voice_template_from_samples(np.frombuffer(recording_data, dtype=np.int16), sample_rate)
    templates.append(template)

# 5. Match two templates
result = voice_template_matcher.match_voice_templates(templates[0], templates[1])
print(f'Verification result: {result}')